Once you have your LAMP stack installed, your VPS server is ready to host WordPress site. But you have nothing on your web host. In this guide, we’ll show you the procedures of installing a WordPress site.
Before you beginning, don’t forget to point you domain A Records to your public IP. Make sure you connect to your server as root via SSH.
Set up a domain name
Firstly, you need to create a name-based virtual host for your WordPress blog. I uses the domain www.wordpresshostinggeek.com for example. Replace it to your domain name when you start. Here’s how:
1. Create a folder to hold your WordPress website:
mkdir /var/www/wordpresshostinggeek.com
2. Create sub-folders to store WordPress files, logs, and backups.
cd /var/www/wordpresshostinggeek.com
mkdir -p public_html
mkdir -p log
mkdir -p backups
3. Create the virtual host file.
nano /etc/apache2/sites-available/wordpresshostinggeek.com.conf
Copy and paste the configuration shown below into the virtual host file you created.
# domain: example.com
# public: /var/www/wordpresshostinggeek.com/public_html/

<VirtualHost *:80>
  # Admin email, Server Name (domain name), and any aliases
  ServerAdmin webmaster@wordpresshostinggeek.com
  ServerName  www.wordpresshostinggeek.com
  ServerAlias wordpresshostinggeek.com

  # Index file and Document Root (where the public files are located)
  DirectoryIndex index.html index.php
  DocumentRoot /var/www/wordpresshostinggeek.com/public_html
  # Log file locations
  LogLevel warn
  ErrorLog  /var/www/wordpresshostinggeek.com/log/error.log
  CustomLog /var/www/wordpresshostinggeek.com/log/access.log combined
</VirtualHost>
Save the changes by pressing Control + x and then pressing y.
4. Enable your new website
a2ensite wordpresshostinggeek.com.conf
5. Restart Apache to save the changes.
service apache2 restart
Congratulations! Your VPS is ready to host a website. But you website is still empty. Let’s create a MySQL database for your WordPress.
Creating a WordPress Database
WordPress stores all posts and settings in a database. Now we create a database using the following command:
1. Log in to MySQL
mysql -u root -p
2. Create a database. ( Replace databasename to whatever you want for your WordPress site. )
create database databasename;
3. Create a new user ins MySQL for WordPress to access the new database.
grant all on databasename.* to 'user_name' identified by 'user_password';
4. Reload the grant tables
flush privileges;
5. Exit MySQL
quit
You have a database for WordPress. It’s time to finally add some content for your website.
Install WordPress
1. Download and extract WordPress to website root directory.
mkdir -p /var/www/wordpresshostinggeek.com/public_html/wordpress
cd /var/www/wordpresshostinggeek.com/public_html/wordpress
wget http://wordpress.org/latest.tar.gz
tar -xvf latest.tar.gz
cp -R wordpress/* /var/www/wordpresshostinggeek.com/public_html/
cd ..
rm -rf wordpress/
2. Set the owner of website root directory to default Apache user:
chown -R www-data:www-data /var/www/wordpresshostinggeek.com/public_html/
Configure WordPress
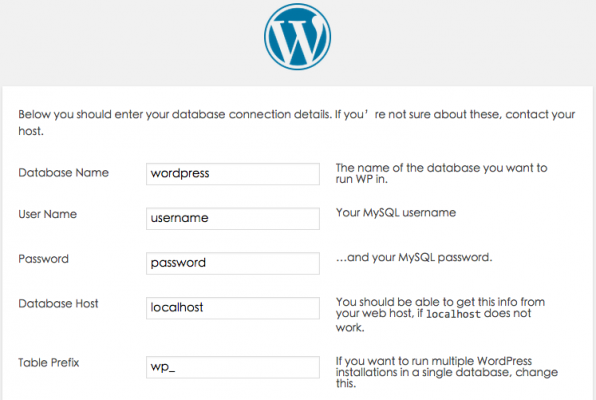
1. Visit you domain and follow the WordPress configuration process. Provide WordPress with the database name and connection access.
2. Config WordPress to update or install new themes or plugins without FTP.
nano /var/www/wordpresshostinggeek.com/public_html/wp-config.php
Copy and paste to the end of the wp-config.php file.
define('FS_METHOD', 'direct');
3. Enable the mod_rewrite module for some WordPress functions.
a2enmod rewrite
4. Create a .htaccess file to enable static permalink settings in WordPress.
cd /var/www/wordpresshostinggeek.com/public_html/
nano .htaccess
Copy and paste the following content:
<IfModule mod_rewrite.c>
 RewriteEngine On
 RewriteBase /
 RewriteCond %{REQUEST_FILENAME} !-f
 RewriteCond %{REQUEST_FILENAME} !-d
 RewriteRule . /index.php [L]
</IfModule>
5. Then restart Apache to load the new module.
service apache2 restart
Congratulations! You have now successfully installed WordPress! Enjoy you journey!